
In this tutorial, you are going to learn a technique in inkscape to create a soft, feathered background.

The beauty of this technique comes from the fact that it relies heavily on clones, and live path effects. You spend a little time rigging up the effect, and then you can fluidly change the clone originals to update the result.
A bit confused? Just follow the steps, and hopefully everything will become clear!
Spawn a Spectacular Spiro
First up, we need to draw a curve with 5 points, and add the Spiro path effect to make it nice and smooth.
Detailed Steps:
- Draw a Curved Path
Using the pen tool, draw a curved path with 5 points. Make sure that all segments are curves.

- Open Path Effects
Open up the Path Effects dialog using Path > Path Effects

- Add New Effect
Making sure your path is still selects, click on the + icon at the bottom of the Path Effects dialog to add a new path effect to the path.

- Add Spiro Effect
In the Add Path Effect dialog that appears, choose the Spiro Spline option, then click the Add button.

- Gaze at Spiro
Your curve should look a lot smoother now; that is the awesomeness of the spiro.

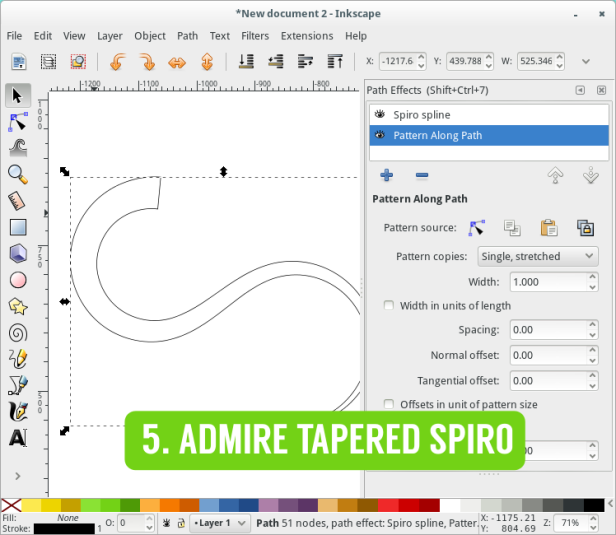
Taper the spiro with pattern on path
Next up, add a triangle “brush” to our spiro curve using the Path Effect Pattern on Path.
Detailed Steps:
- Draw a Triangle
Using the pen tool, draw a triangle

- Copy to Clipboard
Select the triangle, and copy it to the clipboard using Edit > Copy. After copying it to the clipboard, feel free to delete it. (or keep it if you are sentimental about your triangles)

- Add Pattern on Path
Like when adding the spiro path effect, open the Path Effects dialog, click on the + at the bottom to add a new path effect. This time, choose Pattern on Path from the dialog, then press the Add button

- Paste the Triangle
In the path effects dialog, Click the clipboard icon to paste the triangle we copied in step 2. The triangle is the pattern (“brush”) we are putting on our path (the spiro).

- Admire Tapered Sprio
your tapered spiro should look something like this.
Unset the original
In this phase, we unset the fill and the stroke of the tapered curve that we are going to clone later
Detailed Steps:
- Unset Fill
Right click on the “None” label next to fill in the bottom right corner, and choose “Unset Fill” from the menu that appears

- Unset stroke
Right click on the black box next to stroke in the bottom right corner, and choose “Unset Stroke” from the menu that appears

Bring in the Clones
Next, we need to clone our path, move the clone away from the original, change the colour, and duplicate it several times.
Detailed Steps:
- Select Path
Using the select tool, select the path.

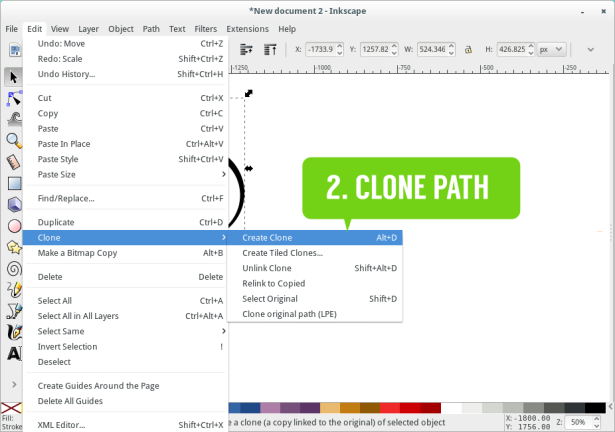
- Clone Path
Clone the path once, using Edit > Clone > Create Clone or ALT + D
- Move Clone
Move the Clone away from the original to a different part of your drawing

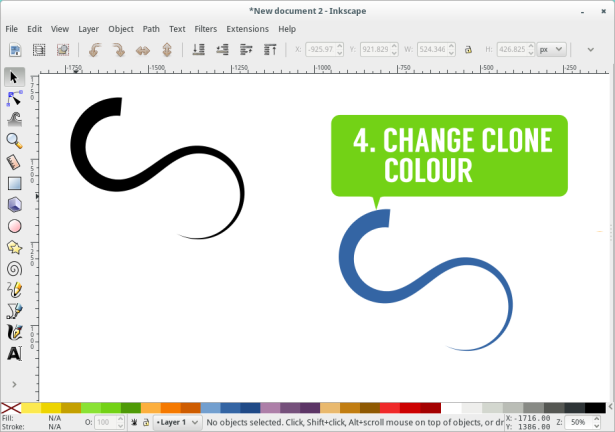
- Change Clone Colour
Change the colour of the clone either with the palette or the Fill / Stroke dialog. Note that at this point only the clone should change colour. If both objects change, you are likely changing the colour of the original
- Duplicate 30X
Duplicate the coloured clone 30 or so times using Edit > Duplicate or CTRL + D

Jitter, jitter, jitter, those clones
In this phase, we are going to use the tweak tool to jitter the position of our 30 clones, as well as jitter some the saturation and lightness values of the clones.
Detailed steps:
- Select all 30
Using the select tool, select all 30 of your clones. (the easiest way to do this is to click and drag around the clones.)

- Tweak Tool
Switch to the tweak tool by clicking the tweak tool icon from the toolbox.

- Choose Move objects Mode
From the Tweak tool’s Tool control bar, choose the Move Objects mode:
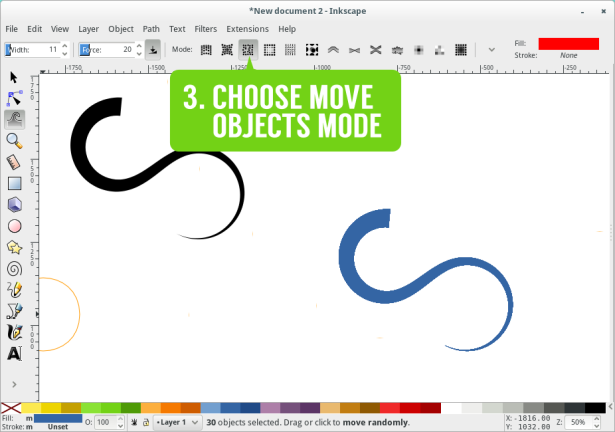
- Click n Drag
Now click and drag the tweak tool over the clones and watch them bounce around. You may need to play with the Width and Force values of the tweak tool. Note also, that the selection outline of the objects is usually not shown when in the tweak tool (glance at the status bar to confirm you, indeed, have them selected). Your end result should look something like this:

- Lower opacity
With the 30 clones still selected, open the Fill / Stroke Dialog, and lower the opacity of the clones. In my example, I chose a value around 30%.

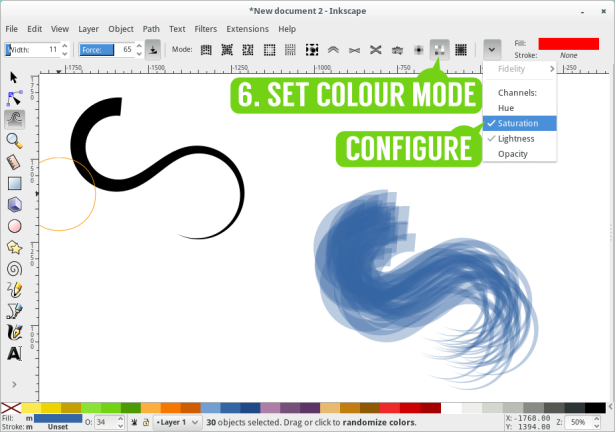
- Tweak the colours
Still, with the 30 selected, switch back to the tweak tool, and this time set the mode to Jitter Colours. Then make sure the only 2 values checked / toggled are saturation and lightness. Note that in the below example (because the inkscape window is smaller) the channels are hidden in a dropdown. In a larger window they will show as toggle buttons in the toolbar.
- Click n Drag (again)
As with step 4, click and drag over the clones and watch their colours change slightly. If the change too much, consider tweaking the Force value

Where the magic happens
This is the phase where we play with the original that all our clones are based off, as well as our triangle “Brush”.
Detailed Steps:
- Change to Node tool
First, select the Black original , and change to the node tool. The familiar node editing handles should appear

- Play with the spiro
Play with the nodes of your spiro to make a better curve. If you have done all the previous steps correctly, your blue creation should update with the changes to the black original path. Play around til you get something that you like.
- Edit pattern Source:
Click on the Show pattern Source button in the Path Effects dialog, and somewhere on the inkscape canvas, your triangle should appear (you may need to zoom out to see where it appears. if it is far from your drawing, select all 3 nodes and move it closer.)

- Now, using the node tool, edit the triangle shape, adding and moving nodes. Your changes should update as you go on the black original path, and the blue clones. Magic, huh?
Finishing off
Here we duplicate our 30 clones a bit more, rotate each group a bit, and tweak the opacity of each group
Detailed Steps:
- Group your 30 Blue clones together
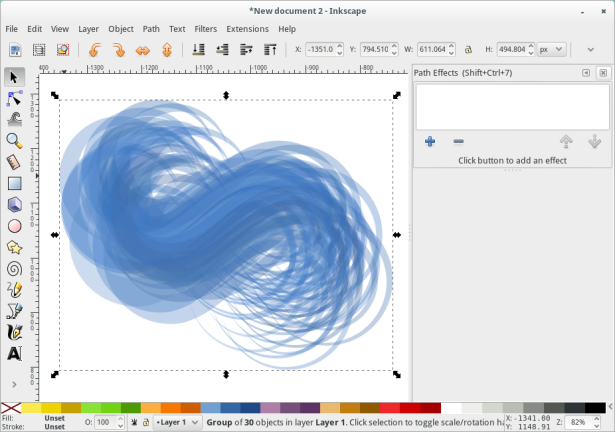
- Now duplicate the group about 2-3 times, and rotate each one a bit, and play with the opacity of the groups:

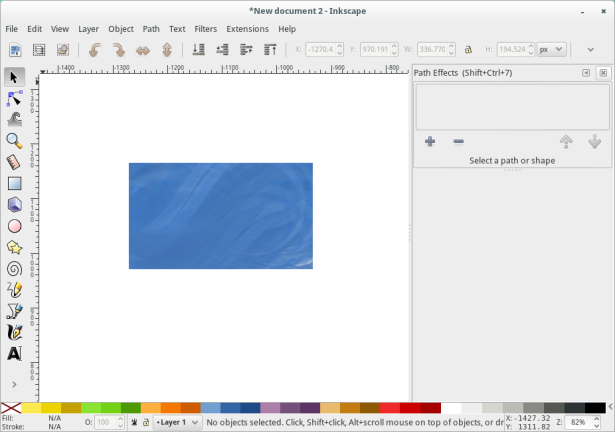
- Now, draw a rectangle over the area, and use a clipping path to create your nice square background:

Keep Playing
Remember, that you can still play with the black original path, and your triangle brush path to tweak and change your background even more:

thank you
LikeLike
What a beautiful tutorial. Thank you!
LikeLike
Great tutorial Ryan, you put so much effort into making Inkscape so much easier to figure out for the rest of us:)
LikeLike
Wow, amazing tutorial, and even a newbie like me can follow. I still have a little problem though. Afet cloning the initial path, when I change the color of the clone, it stays black. In the Fill and Stoke window I can change the alpha but it stays in shades of grey. Is there something I can do ?
Thanks a lot anyway because I’ve already learnt so much thanks to this tutorial 😀
LikeLike
Thanks for your kind words!
It sounds like you didn’t “unset” the fill and or stroke of the original. see the step “Unset the original” in the tutorial!
Try it out with just a simple clone. Draw a circle, unset the fill, then Alt+D to clone it. If you have unset the fill correctly, you should be able to change the colour of the clone.
LikeLike
Oh man, sorry for that, I had a problem and so I thought it would be a good exercise to do it again from the start and I just kept forgetting to unset fill and stroke! Well at least now I can do it with my eyes closed 😀 Thanks again for all the help, I’ll be more careful next time 🙂
LikeLike
Good article and good tips also.
i’m newbie in inkscape, this tutorial is very very useful.
LikeLike
Awesome! You did an impressive job right there. Thanks!
LikeLike
Very instructive, thank you for sharing!!!!!
LikeLike