
Creating and editing PDFs in Inkscape is pretty simple. This quick tip will cover the basics of saving your Inkscape SVG to a PDF, as well as using Inkscape’s PDF import functionality.
Saving to PDF
Once you have your document or picture created in Inkscape, to save it as a PDF it is pretty simple. All you need to do is go to File > Save a Copy in the inkscape menus to bring up the Save a Copy dialog box. In this box, choose Portable Document Format (*.pdf) from the dropdown in the bottom right corner above the Save button.

Once you type in your filename, and click Save, the following dialog will appear giving you some options for the PDF export:
 Here you can edit options for the PDF output like setting the version of PDF export, whether you want to embed fonts (or convert text to paths or curves), and whether you want to rasterize filter effects like blurs.
Once you click OK, your PDF will be exported and ready to use.
Opening a PDF
Importing / Opening an existing PDF into Inkscape is also quite simple. In the inkscape menu, go to File > Open, and open up the PDF, and the following dialog will be shown:
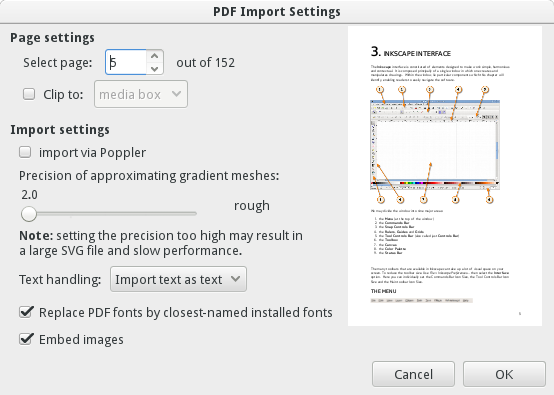
Here you can choose the options for the PDF import. The main option here is choosing which page to import — as inkscape can only do single page documents, you will need to choose the page of the PDF to import. Other options include using the alternative Poppler based import, and how to handle fonts import.

That’s ok so far, but I wonder what all these settings in the PDF dialog means and what is the best for me. I’m gonna use the PDF for screen printing. Thanks a lot for any help.
LikeLiked by 1 person
I agree with Reidar, I’m looking for what the setting mean 🙂 Thanks
LikeLike
Hello! When I save my file in PDF my background image disappear! Why? Can someone help me, please? 🙂 Thanks
LikeLike
Everything worked up until i opened the pdf file and only small section of what i created was visible. Help please?
LikeLike
I’m trying to open a .pdf file of a box from boxmaker.connectionlab.org. I’ve tried pretty much every option available, but all that shows up is the text portion. I want to design a box that I can cut out on the laser engraver at our local FabLab.
Any advice?
LikeLike
Comment créer un fichier sur inkscape ?
LikeLike
Hello, I am looking for a way that will allow me to save in PDF/x-1a but I’m not getting it. Can you help me? I really need this for exporting files for work.
LikeLike
Nice tutorial, Ryan Lerch. The PDF files are used by the million of users and PDF files are Compatible Across Multiple Platforms. These files can be shared across multiple devices and machine. These files are also used to preserve the images and text. That is why every user needs to learn how to edit the PDF files.
LikeLike
Nice tutorial, I need this for the sake of my work, the article is very useful and helpful
LikeLike
Amei como sem;&er#8230pmas me tira uma dúvida os cÃlios ñ devem ser usados durante o dia? pq de vez em quando uso! bjsssss e LINDA como sempre… []Camila Coelho Respondeu:May 3rd, 2011 em 6:19 pm, Obrigada flor! Nao e isso amore, os cilios podem ser usados durante o dia sim, mas muita gente nao gosta pq fica muito dramatico sabe? hehe Bjinhosss flor []ana Respondeu:May 4th, 2011 em 2:25 amOk!!!Obrigada mais uma vez pela dica! []
LikeLike
Thanks for the article, but am afraid it’s not working at my side, after i save to PDF when I open the PDF file it shows blank pages, no designe or pic or anything just white page.
LikeLike
Sure you have made everything to paths?
have you downloaded the latest version of inkscape?
Check also the page setup.
LikeLike
Hi, yes i’ve selected to paths, i only got to know inkscape a week ago that’s when i installed it so it’s the newest version i guess (inkscape 0.91). with regard to page setup i’m not sure what/where exactly should i check that? if it’s too much trouble to explain i’d honestly understand if you can’t explain it all here. Either way, thank you.
LikeLike
Ryan, thank you for great tutorial!
I recommend also ZetPDF.com
LikeLike
Denver has never been a favorite NBA destination, and as I have covered before, recent efforts by management to cover up bad decisions have made it even worse.
The problem is, the Heat are still contenders in the Eastern Conference, and by trading Whiteside aw.
The Nuggets won the quarter 12-9 to secure a 78-74 victory.
Due to Trace McSorley’s improvement, the Nittany Lions are well on their way to the top of the conference.
Basically, the Sooners’ College Football Playoff hopes are on the line this weekend.
LikeLike
How can I make a transparent.PNGbfile 4200×4800 pixels and 300 ppi
LikeLike
Correction transparent.PNG file
LikeLike
Superb content, we’ll try this on our personal blog site. Nice one for sharing.
LikeLike
When I import my illustration and add text then save it, the quality of the image goes down quite a bit. How can I save and keep the original quality?
LikeLike